How good would it be if you can show one offer to your existing subscribers and another to non-subscribers?
For example, you can ask non-subscribers to opt-in to your list, and those who are already in your list to buy something.
Here is what’s happening to most blogs that actively build a list:
They have an opt-in popup that is shown to both subscribers and non-subscribers.
This is not only annoying to the existing subscribers, but also a lost of income to the bloggers because they could have promoted something else to their existing subscribers.
Another issue is tracking.
Since the opt-in offer is shown to both subscribers and non-subscribers, the conversion rate is inaccurate, as the traffic registered includes existing subscribers.
As you can see, failure to customize your offer to different audience is a lost of income to you. It will also disrupt your optimization effort. The good news is, we’ve got a fix!
An Overview Of How Customization Is Done
To make customization possible, you need to track and classify the visitors on your website/blog.
Once you can classify your visitors into groups, you can then present different offers to different group.
Hence, before customizing the offers, we need to classify the visitors into different groups. This is done by using a web technology called cookie.
What Is Cookie?
Cookie is nothing new. It’s basically a small piece of data that…
– is created by you (or rather the script on your website);
– is store in your visitors’ browsers when they visit your website;
– can be retrieved by you (or rather the script on your website) the next time they visit your website.
The data stored in a cookie includes:
1. a cookie name, so that you can retrieve it later by its name,
2. a value (which is the content that the cookie holds),
3. an expiry date (that decides how long the cookie is valid),
4. a domain and path (that decides whether the cookie is valid throughout the website, certain directory or subdomain of the site.)
These are the basic things you need to know about cookie. If that sounds overwhelming, just know that a cookie has a name and a value. You only need to know that to classify your visitors.
How To Use Cookie To Classify Site Visitors?
Now that you know what is a cookie, let’s look at how to use it in practice.
When someone subscribes to your list, chances are he/she will go to a thank-you page or some kind of download page.
On that page, you can create a cookie called ‘userType’ and set its value as ‘subscriber’. This cookie will be saved in the subscriber’s browser.
To bring the idea further, say if someone buys something, on the product download page, you can create the same cookie called ‘userType’ but set its value as ‘buyer’.
This means you can now classify your visitors into 3 groups:
Group 1 – non-subscribers (i.e. those without ‘userType’ cookie in their browsers)
Group 2 – subscribers (i.e. those with ‘userType’ cookie and ‘subscriber’ as the value)
Group 3 – buyers (i.e. those with ‘userType’ cookie and ‘buyer’ as the value)
Whenever someone visits your website, you can retrieve the ‘userType’ cookie and find out if that visitor is a subscriber or buyer. If nothing is retrieved, it means that visitor is a non-subscriber.
Get the idea?
“Kenneth, what about my existing subscribers? They are not going to visit the thank-you page again.”
For these people, you can email them an offer and add the cookie when they visit the offer page. You may have to do that a few times to cover most of your existing subscriber.
If you are running a membership site, it’s easier. Just add the cookie to their browsers whenever your members visit the member’s area.
How to create the cookie?
For that, we’ve created a useful tool called Cookie Generator.
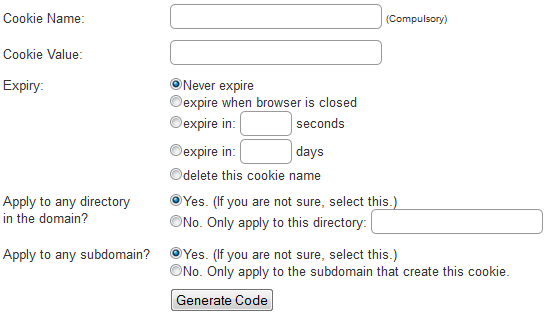
Simply fill in the cookie name and value, click ‘Generate Code’, copy and paste the code into your thank-you page, product download page or member’s area. When your subscribers or buyers go to that page, the cookie will be added to their browsers.
How To Customize The Offers
Once you have the cookie set in your subscribers’ and buyers’ browsers, you can now set up a script to read the cookie and respond accordingly.
The easiest way to do it is to use the new feature in our popup generator.
Go to PopupXpert now. You will see a button called ‘Cookie’ (see arrow 1).
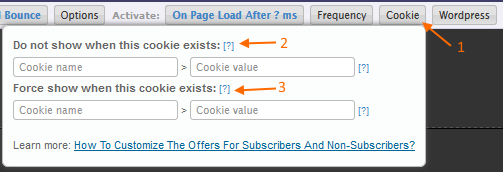
Mouse over the ‘cookie’ button and you will see 2 settings denoted by arrow 2 and 3 above.
You can either tell the script NOT to show the widget when a cookie exists, or FORCE show a widget when a cookie exists.
For example, let’s say you have 2 offers – an opt-in offer and a product sale offer.
– The opt-in offer is shown to non-subscribers
– The product sale offer is shown to subscribers but NOT buyers, since they have already bought.
Conceptually, for the first offer, you want to show to visitors with NO cookie set (since whose with cookies are either subscribers or buyers). Make sense?
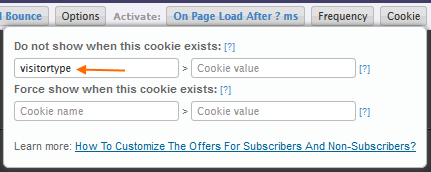
For this offer, you activate ‘Do not show when this cookie exists’ (see arrow 2 above) by entering the Cookie name as ‘userType’, leaving Cookie value empty. What it means is this offer will not be shown if the cookie ‘userType’ exists, regardless of what its value is.
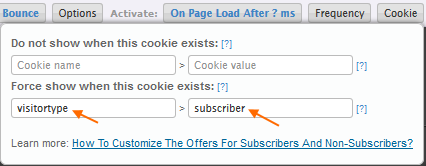
For the second offer, you only want to show to your subscribers who haven’t bought from you. You can accomplish this by setting ‘Force show when this cookie exists’ (see arrow 3 above). For Cookie name, enter ‘userType’. For Cookie value, enter ‘subscriber’.
Here is what happen when the campaign is executed:
Non-subscribers will see offer 1, subscribers will see offer 2, and buyers will not see anything.
That’s how you customize different offers to different audience.
Step By Step Guide
It may seem overwhelming at first, but once you get the hang of it, you can set up a campaign in a few minutes.
If you are ready to put this to work, here is a step-by-step guide you can follow:
1) Add a cookie to your subscriber thank-you page and/or product download page using the Cookie Generator. For cookie name, enter ‘visitortype’. For cookie value, enter ‘subscriber’. For the rest of the parameters, just use the default options.
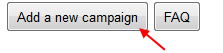
2) Go to PopupXpert Manager and add a new campaign. Name it as ‘Custom Offer’.
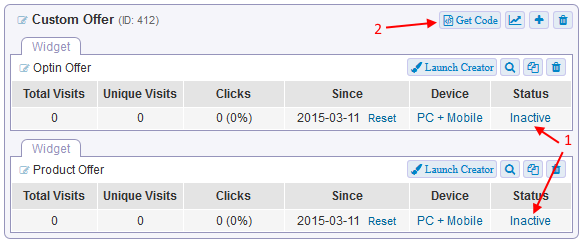
3) In that campaign, create 2 widgets (one widget for one offer). Name the widgets ‘Opt-in Offer’ (see arrow 1 below) and ‘Product Offer’ (see arrow 2 below).
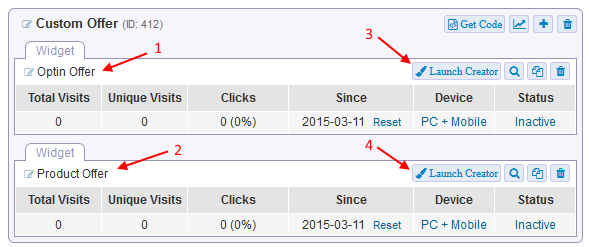
4) Next, design each widget by clicking the respective ‘Launch Creator’ button (see arrow 3 and 4 above).
If this is your first time using the PopupXpert, spend some time to play with it. You can create different kinds of animated offers with different event triggers. You can even design like a pro without much programming experience. Always click on ‘Help’ if you are stuck.
In the next two steps, I want to highlight to you the settings for the cookie option.
5) For the Opt-in Offer, under ‘Do not show when this cookie exists’, enter ‘visitortype’ as the Cookie name. You can leave Cookie value blank. This means it applies to any value.
6) For the Product Offer, under ‘Force show when this cookie exists’, enter ‘visitortype’ as the Cookie name and ‘subscriber’ as the Cookie value.
7) Go back to the PopupXpert Manager, activate the two widgets by toggling the Status (see arrow 1 below), then click Get Code (arrow 2). Follow the Get Code instruction to add the code to your website/blog.
That’s all.
Once the campaign code is added to your website/blog, there is no need to touch it anymore.
In the future, you can add more offers (i.e. more widgets), rotate those offers to do split testing, add more cookie restriction to cater to buyers, or change the offer, all within the PopupXpert Manager. The offers on your website will be updated instantly! That’s yet another beauty of the PopupXpert.
I hope you like the new cookie tool and customization feature we have added. Let me know what you think in the comments below…
Such a nice idea. I will try to follow this tips and see the good results.
I’m just really flabbergasted by the LeadsLeap system and everything of so much value that Kenneth offers here. I’ve NEVER found a website on the entire web that even is half-way comparable in value.
I would truly like to say a genuine thank-you Kenneth for all that you do! There are those of us like myself who truly appreciate your efforts and what you do!!
Thank you sir!
Gary Jordan
You’re welcome. I’m glad that you like what we’ve offered.
Cheers,
Kenneth
I second that Gary, I couldn’t have said it better myself.
Nice tutorials.
Wow, Leads Leap, is an Awesome Site!
Thanks Kenneth works fine, I did not expect. Excellent work …
Sincerely Sergey.
Thanks Kenneth! This is definitely a useful tool that integrate well with Pop-up experts.
However, I have a slight issue with Pop-up experts. Whenever I place the code at my sidebar, my post’s paragraph spacing will be removed. i.e. all my paragraphs sticks together.
Could you advise me if there is any work around on this or something I missed out?
Thanks so much!
Hi Edmund,
Please contact our support with your website url. We will take a look at it and fix it for you asap.
Noted Kenneth. Thanks for your prompt reply!
Thanks again Kenneth for this post. Everything is always so easy once you understand how, and your article was easy to follow. I’m off to have a go at creating my first cookie for my site so that I can separate my subscribers from new visitors.
Simply brilliant!
Cheers
Rui
My first Experience to subscribe it. Looking forward to more current updates from your side.
This is best feature leadsleap is providing, I really like it.
Doing Cookies your way opens up many possibilities for improving the results of my website traffic. Thanks for the professional presentation.
Kenneth man this is awesome!!! I will be implementing this into my site!!
Hi Kenneth, this is very helpful and thank you for sharing… I will do this in my website… Thanks again…. :-)
I am very impressed with all the tools you have. It’s hard to find useful tools that are completely free.
This is awesome, Kenneth.
I’m not a programmer, but I did figure out how to get it working.
Thanks
This is exactly what I need! Thank you so much!
I had to read this a couple of times to get it, but it was well worth the time.
Now to combine what is learned on this page with the Pop Up Generator.
Thanks, Bruce
I’m so pleased with my Leadsleap! I have just upgraded to pro, after seeing all the benefits on this platform it’s a pleasure to be using such an amazing system as it’s easy to navigate…
Keep up the great work Leadsleap
Thank you
Thank you, that’s a very detailed explanation, I’m just learning this feature at the moment.